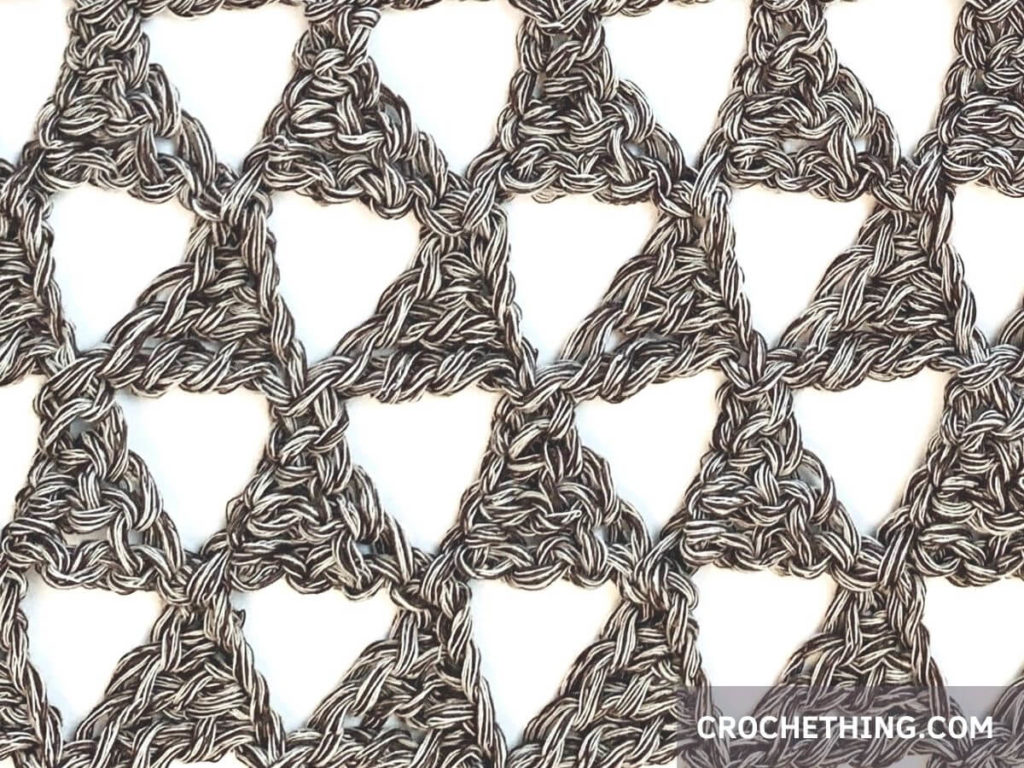
Inspired by the beautiful Beach Cardi Cover Up by Wilmade I recently made a simple summer scarf. I wanted to continue creating shawls with this beautiful stitch. Today I introduce the Tri Tra Triangle Shawl, a crochet triangle shawl featuring a fun triangle crochet stitch. I’ve used 3 balls of Katia Re-Tape, an innovative yarn produced from reclaimed sea plastic and organic cotton using sustainable methods. Scroll down for my free crochet pattern including video tutorial.

About the triangle stitch
The triangle stitch is a variety of chains, single crochet, double crochet and treble crochet. For some it can be boring working with this simple stitch, but for me it’s meditative.
About the pattern
This crochet triangle shawl is worked from side to side. We’ll start with 1 triangle stitch and increase on one side of the shawl. When the shawl is wide enough, we start decreasing. A simple and fun way to create beautiful triangle shaped shawls!

Tri Tra Triangle Shawl
Materials:
– 3 balls of Katia Re-Tape color 200 (weight 3/light, 109yds/100m, 1.76 oz/50g)
– Crochet hook 6mm
– Tapestry needle
– Scissors
Abbreviations:
ch: chain
ch-sp: chain space
sl st: slip stitch
sc: single crochet
dc: double crochet
tr: treble crochet
Gauge:
4 triangles x 4 rows = 4” square
Measurements:
Width: 67″ / 170 cm
Height: 21″ / 53 cm
Notes:
– this pattern is written in US terminology
– turn your work at the end of each row
Tri Tra Triangle Shawl video tutorial
To make it easier, I’ve made a video tutorial showing you how to make this shawl.
Pattern
Row 1
ch 6, 1 sc in 4th ch from hook, 1 dc in next ch, 1 tr in next ch, turn your work (1 triangle total)
Row 2
ch 11, 1 sc in 4th ch from hook, 1 dc in next ch, 1 tr in next ch, sl st in next triangle, ch 6, 1 sc in 4th ch from hook, 1 dc in next ch, 1 tr in next ch, turn your work (2 triangles total)
Row 3
ch 11, 1 sc in 4th ch from hook, 1 dc in next ch, 1 tr in next ch, sl st in next triangle, ch 6, 1 sc in 4th ch from hook, 1 dc in next ch, 1 tr in next ch, sl st in next triangle, turn your work (2 triangles total)
Row 4
ch 11, 1 sc in 4th ch from hook, 1 dc in next ch, 1 tr in next ch, sl st in next triangle,
ch 6, 1 sc in 4th ch from hook, 1 dc in next ch, 1 tr in next ch, sl st in next triangle,
ch 6, 1 sc in 4th ch from hook, 1 dc in next ch, 1 tr in next ch, turn your work (3 triangles total)
Repeat
Row 5
ch 11, 1 sc in 4th ch from hook, 1 dc in next ch, 1 tr in next ch, sl st in next triangle, *ch 6, 1 sc in 4th ch from hook, 1 dc in next ch, 1 tr in next ch, sl st in next triangle* repeat across, turn your work (3 triangles total)
Row 6
ch 11, 1 sc in 4th ch from hook, 1 dc in next ch, 1 tr in next ch, sl st in next triangle,
*ch 6, 1 sc in 4th ch from hook, 1 dc in next ch, 1 tr in next ch, sl st in next triangle* repeat across,
ch 6, 1 sc in 4th ch from hook, 1 dc in next ch, 1 tr in next ch, turn your work (4 triangles total)
Row 7 – 30
Repeat row 5 & 6 (16 triangles total)
Row 31
Repeat row 5 (16 triangles total)
Decrease
Row 32
ch 11, 1 sc in 4th ch from hook, 1 dc in next ch, 1 tr in next ch, sl st in next triangle, *ch 6, 1 sc in 4th ch from hook, 1 dc in next ch, 1 tr in next ch, sl st in next triangle* repeat to second-last triangle, sl st in the last triangle, turn your work (15 triangles total)
Row 33
ch 11, 1 sc in 4th ch from hook, 1 dc in next ch, 1 tr in next ch, sl st in next triangle, *ch 6, 1 sc in 4th ch from hook, 1 dc in next ch, 1 tr in next ch, sl st in next triangle* repeat across, turn your work (15 triangles total)
Row 34 – 59
Repeat row 32 & 33
(2 triangles total)
Row 60
ch 11, 1 sc in 4th ch from hook, 1 dc in next ch, 1 tr in next ch, sl st in next 2 triangles (1 triangle total)
Fasten off and weave in the ends
Photo tutorial
1. ch 6
2. 1 sc in 4th ch from the hook
3. 1 dc in next st
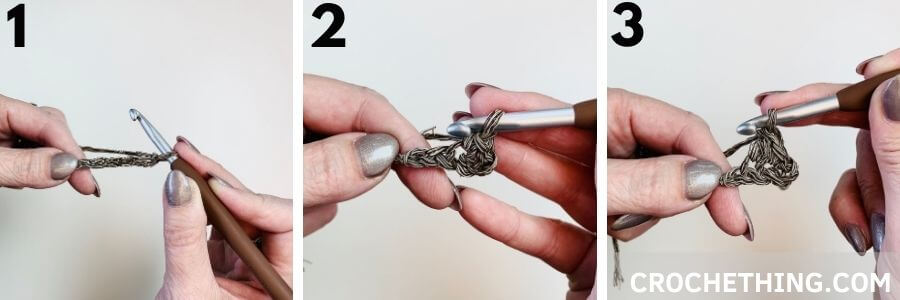
4. 1 tr in next ch/ last ch
5. ch 11
6. triangle
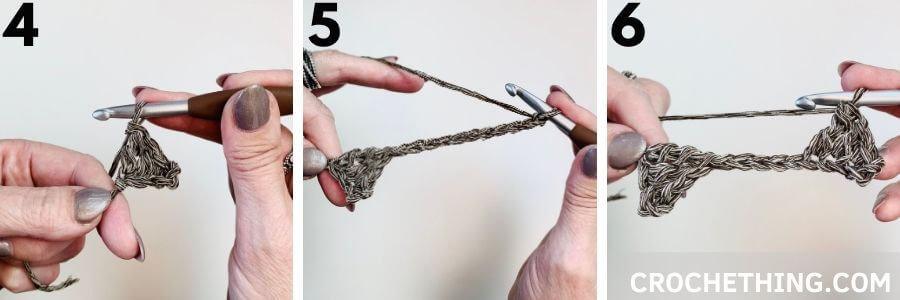
7. flip triangle first row
8. sl st in triangle first row
9. ch 6
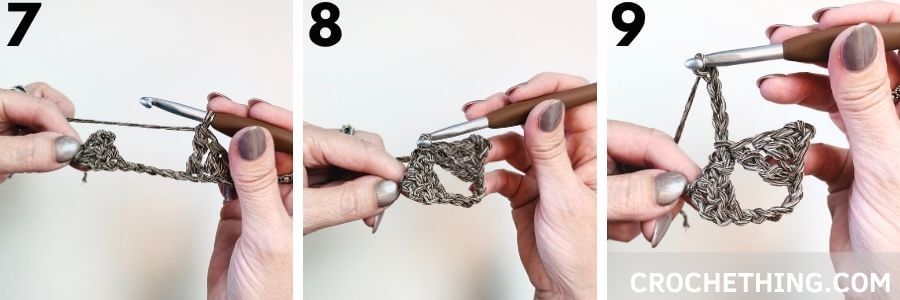
10. triangle = increase
11. ch 11, turn work
12. triangle
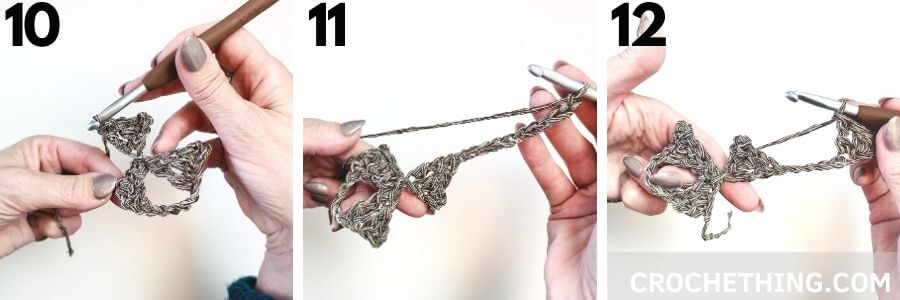
13. row 3
14. row 4
15. row 5
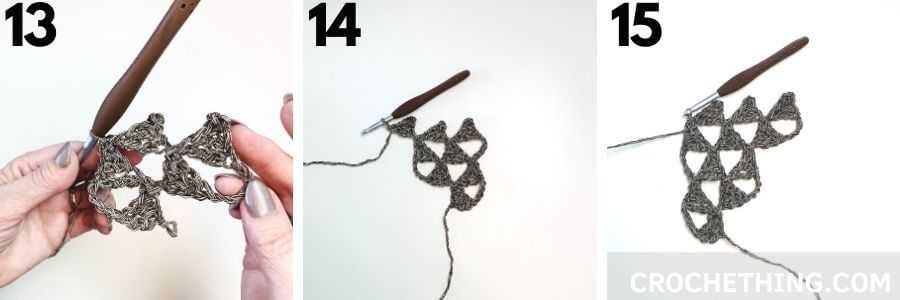
16. end row 32 decrease
17. sl st in last triangle
18. ch 11
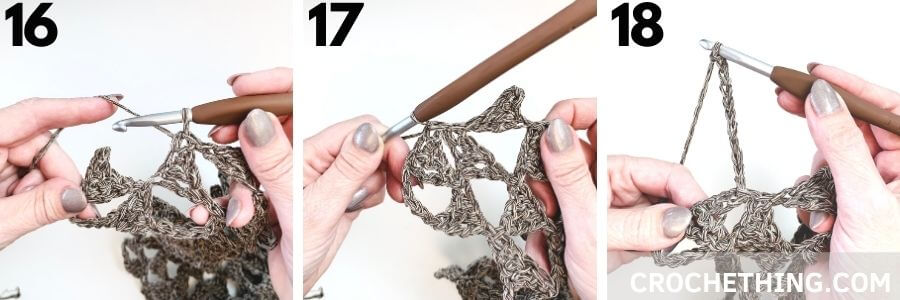
19. triangles
20. sl st in triangle previous row
21. this is how the decrease (and increase) edge looks like
22. row 59 2 triangles left
23. ch 11
24. triangle
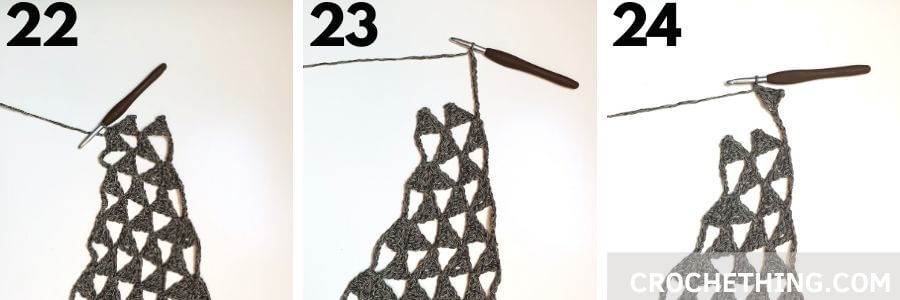
25. sl st in 1st triangle
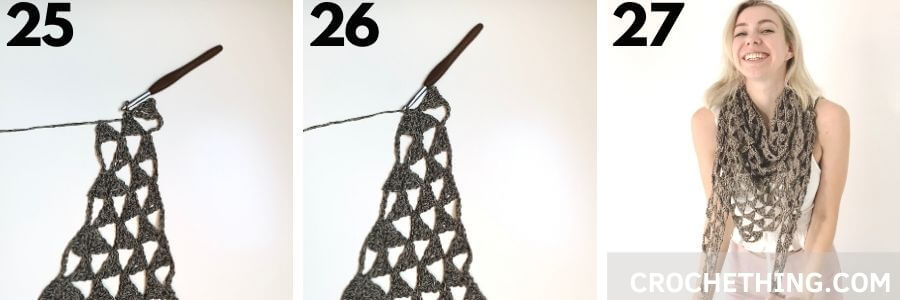
26. sl st in 2nd/ last triangle
27. tri tra done!

This is a lovely shawl! It would be great if you could post a photo of it on Ravelry.
It will get there, we’re on it 😅
Hello,
Do you have any suggestions on how to select which triangle to slip stitch into? I tried this pattern a few times and I am confusing myself.
Rachel, I had the same issue but I it did click after a while (: So after you chain 11 and make a triangle, flip the piece( start of a new row)and you connect the 1st triangle of the new row to the last triangle of the previous row. After that every time you make a new triangle keep connecting it to the triangle left of the one you just connected it. To try to keep it simple, after you flip and start a new row your going backwards(direction towards beginning of the previous row) and connecting the new triangle to the previous row one. Hope this helps, happy crocheting!
I am also confused on which triangle to slip stitch into. I get confused with so many triangles.
Mitzi, I had the same issue but I it did click after a while (: So after you chain 11 and make a triangle, flip the piece( start of a new row)and you connect the 1st triangle of the new row to the last triangle of the previous row. After that every time you make a new triangle keep connecting it to the triangle left of the one you just connected it. To try to keep it simple, after you flip and start a new row your going backwards(direction towards beginning of the previous row) and connecting the new triangle to the previous row one. Hope this helps, happy crocheting!
Very pretty shawl! The stitch definition is amazing.